Tim Phelps
Colored pencil is versatile in its use in both medical and veterinary illustration for the depiction of a variety of representational textures and tissues. The suggestion of tone and color can be created in linear strokes with a series of lines and cross hatching marks or created in paintery fashion through color layering and burnishing techniques. It also is an attractive compliment to mixed media including computer generated illustration.
The need for a consistent and reliable technique which reproduces well in color and continuous tone has drawn me to Prismacolor® and Verithin® colored pencils combined with mixed media. This technique was selected because it provides artistic latitude as well as a broad range of possibilities for the depiction of various tissue types. Most importantly, it fits well with my personal style of drawing and rendering.
Used on their own, or combined with airbrush, opaque watercolor or acrylic washes, colored pencils are a very versatile medium. Tones and values are easily built up by either layering pencil strokes in linear patterns of parallel or cross hatched lines or by blending the color with burnishing. Using the linear approach has allowed me to display my personal style with a casual yet directed manner. This pencil media encourages self expression with few boundaries, except those imposed by the rules of accurate recording in medical and scientific illustration. And, colored pencils offer a seamless transition with current computer drawing and painting programs. Once the drawing is completed, it can be scanned into a computer and manipulated as desired, either as a finished drawing or serving as underpainting for the illustration to come. Interest in the use of colored pencils continues to be desired by those trained in the use of traditional media--the love for the touch of pencil to paper, like other artist's tools in hand, will never fade.
Figure 1. Linear pencil strokes create an individual tapestry effect in the Canine Eye.
Figure 2. Colored paper stock provides a middle toned ground for Biliary Lithotripsy.
The use of colored pencils in drawing is often predicated on personal
choice or subject matter. Use may be dictated by the subject being portrayed;
fur, feathers and hair are well suited to linear strokes and side-by-side
cross hatching technique (Figure 1). Particular anatomic organs and tissues
may be better portrayed using physical layering, burnishing and mixing
of colors. By retaining the inherent character of pencil strokes learned
in youth, individual style can blossom, leading to "pencil-painting"
with a textural tapestry of interwoven lines, colors and marks. Ultimately
it becomes an matter of personal expression, which is quite satisfying
for every artist. Good draftsmanship, confidence and patience all play
a strong role in the success of this media. Even so, the medium is quite
forgiving, allowing for creativity in making, correcting and learning
from mistakes. Combining the pencils with other materials is also a vital
trait for a successful and enjoyable outcome.
A number of assignments have allowed me to experiment in a variety of
media well suited to publishing and editorial markets. I have used colored
pencils effectively in assignments for college level textbooks in allied
health and lay audience veterinary magazines like Cat Fancy and Dog World
along with consumer publications like USA Today. I continue to embrace
the media for fine art subjects too.
Step by Step
The sketch is prepared and approved by the client. At this stage, all of the important anatomic details are accurately drawn. The sketch has defined linear contours which will become an intrical part of the illustration. The amount of sketchiness depends upon personal style. A color comp is prepared quickly by photocopying the sketch and blocking in intended colors. This stage should be approved by the client as well.
Next, the final sketch can be transferred to the selected drawing surface by a number of methods: graphite transfer, lightbox or by projection. The sketch could also be sent through a photocopy machine with colored toner in "line mode" or with black toner in "photo mode", printed on color paper stock. As an alternative to the above methods, the art can also be sent to the blueprinter. The resulting blue or brown lines can enhance the drawing, serving as an underpainting for the color work to come.
If you are using colored paper stock as a middle ground for your drawing (Figure 2), begin sketching with a white Prismacolor pencil with ample pressure, to secure the highlights. By alternating between light and heavy pressure with linear strokes, the drawing's emerging defined highlights begin to take on a painterly look.
Lighter areas of the local color of tissues are also shaded with a soft touch. Local color refers to the tissue's natural or resident color under normal lighting conditions. This method of shading allows the light source to be indicated early and directs the future mapping of shadows and core shadows. In this manner, volume and space are beginning to take shape. Background shadows and atmospheric effects can be added at this stage too.
Next, begin outlining structures with a slightly darker tint of the local color. A light touch with a constantly sharpened pencil helps to achieve thin sharp lines. A block of fine sandpaper or an electric pencil sharpener works well to maintain a constant point. Soft shading with darker tints of the local color further enhance the core shadow areas as well on their edges for a smooth transition of color. Shades of the tissue's local color are applied again with a light touch with smooth, soft shading, slowly building up color value and intensity. Blending is achieved either by burnishing or layers of cross hatching stroked lines from different directions.
Figure 3. Burnishing provides smooth blends and translucency in Pulmonary Interstitial Disease..
Figure 4. Linear strokes are combined with burnishing for an effective portrayal of muscle fascicles in Canine Musculature.
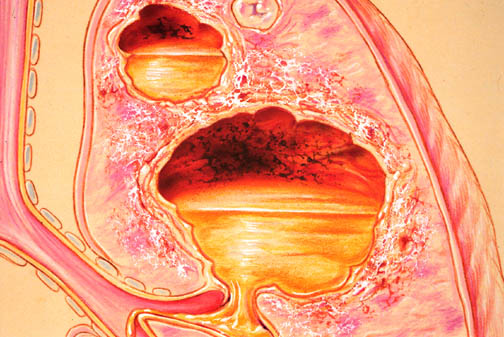
Figure 5. Mixed media is effective for the depiction of a variety of tissue types and pathology in Lung Abscess.
The established tissue's local color is further enhanced with a variety of Prismacolor pencils in the same color family. Using medium pressure with broad strokes, areas can be carefully blocked in. The harder the pressure, the smoother the final result. Burnishing too hard, succeeding strokes will not blend in. Using the point of the pencil as well as its side, this method of layering and burnishing color provides a vibrant translucent quality (Figure 3).
Another example of the burnishing principle can be seen in the rendering of skeletal muscle (Figure 4). After defining individual fascicles of the muscle bundle or sheet with white striping in highlight areas, the darkest crevices of the muscle are laid in with a Verithin purple or magenta pencil. Using various shades of reds and blushes of Prismacolor pencil, the blending and burnishing begins. A linear pattern or stroke emulates the striations present in muscle fibers. The Verithin pencil line keeps its integrity beneath the Prismacolor shading as it blends with it. After a middle value of local color is applied, the highlights and dark crevices can be redefined again. Burnishing with lighter colors smooth the highlight areas while burnishing with darker colors smooth the core value areas. The color can be further pushed and pulled from light to dark, warm to cool in this fashion depending on the choice of colors applied.
Other media techniques work well in conjunction with colored pencil burnishing. These can include the airbrush, splatter with a brush or toothbrush and sponging. Each of these methods add not only a spontaniety to your artwork but also a touch of realism to the look of the rendered tissue. (Figure 5). Techniques like these should come close to the completion of the illustration due to the incompatibility of colored pencil strokes and airbrushing. Once an area has been airbrushed with acrylic paint the surface will not accept further pencil work without scratching the drawing's surface. Previous experimentation with layering of a variety of media will minimize mistakes and lead you to "happy accidents"-those which will push your creativity to its limits; maximizing the fun.
Toward the completion of the drawing, highlight and shadow areas are examined for overall tone and clarity. Accent areas of light and dark can strengthened with further line work or by brush with acrylics. These accents further enhance the 3-dimensional qualities of the drawing by pulling the viewer into areas of importance and focus. Varied pressure on the brush allows for thin and thick dribbles of paint resembling a wet and slippery appearance.
The following are a number of suggestions which can be helpful for effective and enjoyable colored pencil use.
Types of Pencils
By their nature, various brands of colored pencils have different characteristics and creative possibilities. Berol Prismacolor pencils have a soft lead which allows for smooth application and strong color saturation but they will not sustain a sharp line in repeated use without constant sharpening. In contrast, Berol Verithin pencils have a hard lead and a weak color saturation but will retain a sharp line for a longer period during use. Other manufacturers offer water soluble pencils which imitate watercolor painting when washes of water are applied once pencil strokes are laid down. Once mastered, all of these approaches are pliable--- flexible to your individual creative style and intended use.
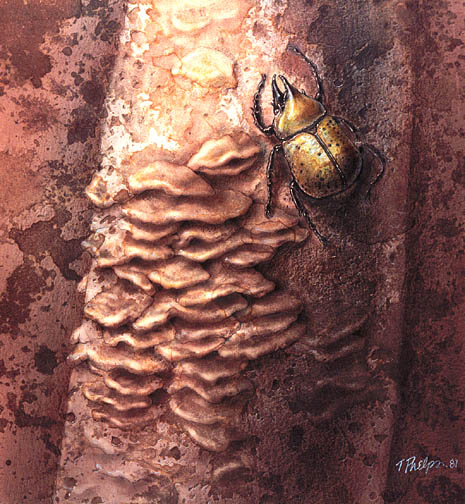
Figure 6. A variety of papers and media treatments including coffee and tea stain techniques contribute to an effective illustration-Hercules Beetle.
Types of Papers
A number of papers will provide a creative substrate for your drawing efforts. Mi-Teintes, made by Canson, comes in a variety of colors and offers two slightly different surfaces on the same sheet, a smooth side, the other with a fine tooth. Like wise Haunemuhle Bugra offers this same surface convention with colored papers falling more into earth tones. Strathmore offers a range of colors but the surface is laid which provides a fairly regular pattern which will show itself in the pencil work. A number of marbled papers can be used either with direct pencil stroking or as a background foundation for scanning purposes for computer drawing applications. You may even create your own backgrounds with coffee and tea stain, sponging and color wash techniques. As you can see, your imagination is in charge. (Figure 6)
Didactic Clarity
Because medical and scientific art teaches, the importance of the development of didactic clarity in the focal areas is critical. Painting with the broadest spectrum of color and tonal value in the areas of focus enhances the illustration's educational value. Important and selective detail, highlights and shadows should also be at their strongest and sharpest in the focal area. These visual cues direct the viewer to the most important "teaching"areas of the drawing.
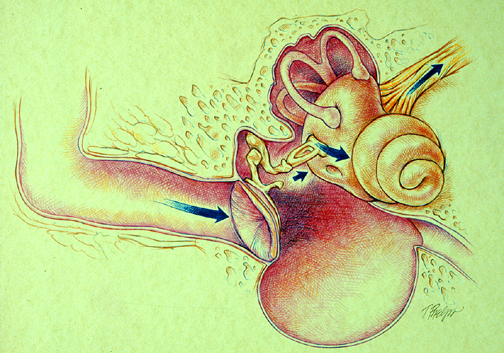
Figure 7. Gestural strokes create plasticity and a painterly effect in Canine Middle Ear.
Gestural Strokes
Gestural strokes with varying thick to thin lines impart a plasticity or life to a drawing and can suggest a painterly quality. One's own drawing style can serve as an underpainting upon which color and tone can shine. Like great melodies in jazz music, the line is laid down and then sweet improvisation takes place. After a wild romp for awhile, we can return to the music's (or drawing's) foundation and be reminded of the glorious subject at hand. Used effectively with less fury, gestural strokes can also offer a resting place, a vignette, or in musical terms-an adagio, to the outer, less important regions of the illustration. (Figure 7)
Grisaille
"Grisaille" or monochromatic underpainting in pencil can provide a suitable platform for subsequent color layering. The tonal values, displayed in a highly developed sketch encompassing a full range of 3-dimensional modeling, highlights and shadows, are perfectly suited to the succession of "washes" of colored pencil strokes or water soluble media to come. Strong draftsmanship allows the drawing to stand on its own but the addition of color enhances its impact.
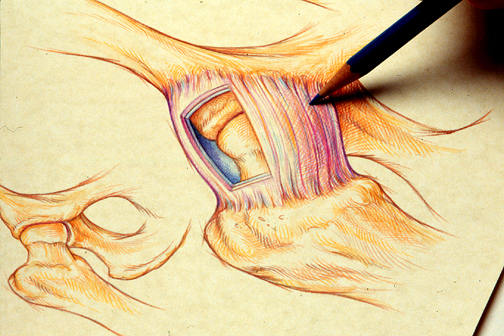
Figure 8. Crosshatched lines are laid in an oblong diamond pattern in Canine Hip Joint.
Cross Hatching
To add character and delicacy to the impact of the illustration, crosshatched lines should be laid down in an oblong diamond pattern whenever possible. Avoid stroking pencil lines at right angles-this method of drawing can impart the look of a screen pattern in reproduction. Darken the tone and character of colors by filling in the resulting diamond shapes with more strokes, short lines or dots in a variety of similar hues. (Figure 8).
Burnishing
Glazing or burnishing combines the use of two or more colors. Once the first color is applied, generally in a middle tone, varying shades or tints of that color are added. White or creamy colors give the drawing a pastel effect. Using vigorous strokes with waxy pencils like Prismacolor, the color is scrubbed into the surface resulting in not only an optical but also a physical blending. This smooth pastel-like appearance can be appealing for a variety of surface and texture depictions in medical and scientific illustration.
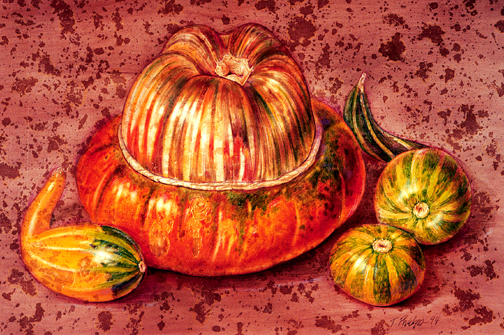
Figure 9. Burnishing colors in the same color and temperature range is effective as seen in layering of the primaries of yellow and red for a more luminescent orange hue in Goards.
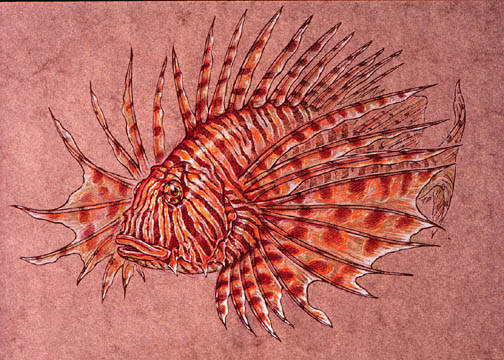
Figure 10. Analogous colors or those found close together on the color wheel are very effective in modulating color and provide a wide range of tonal and hue possibilities in Lionfish.
Layering colors by burnishing or crosshatching allows for the duplication of an infinite number of colors with a imited number of pencils. Like watercolor, the application of color in transparent layers visually creates new ones! Applying colors in layers also adds more light and dimension for overall illustrative visual appeal. For example, rather than applying only the tertiary color of orange, try layering the primaries of yellow and red for a more luminescent orange hue. (Figure 9)
Analogous Colors
Analogous colors or those found close together on the color wheel are very effective in modulating color and provide a wide range of tonal and hue possibilities. Using orange as an example, adding tints of yellows and reds will enliven the hue. Varying the temperature of the color by adding either warm or cool tints, close by on the color wheel, can also become an important and effective element--local color, highlights and shadows can all be enhanced by adjusting color temperature. (Figure 10)
Importance of Gray Scale
For those rare occasions when artwork which may have been commissioned as a color assignment might be later reproduced in black and white, it is important to keep in mind during the creation of the art that the tonal value or tonal range of color should translate effectively into the gray scale. To be suitable for any publication, the line work should also be bold and significant and not too subtle or timid to withstand any photographic reduction or reproduction.
Beware of Over-rendering
Pick your colors and strokes sparingly. Just like watercolor, layering too many colors can result in a muddy mess. This is especially true when burnishing with the softer waxy lead pencils like Prismacolor. Pick colors which are analogous, close in hue and modulate their temperature either warm or cool with minimal layering. Hard lead pencils like Verithins stroked with cross hatching allow for greater latitude; the line patterns and resulting diamond shapes offer wonderful color results. But, don't overdo, practice makes perfect.
Ease of Use
Like the computer, colored pencil drawing is a clean and dry media, one which requires little cleanup after use. As with unlimited computer painting program filter and background choices, a variety of papers with varying colors, textures and grains are available providing a platform for unbounded creativity. Experiment on your own to find your personal style with this media because the possibilities are limitless.
Tim Phelps, Associate Professor, has been teaching and illustrating for 17 years in the graduate program of Art as Applied to Medicine, Johns Hopkins, Baltimore, Maryland. He has received numerous regional and national awards for his work published in textbooks, magazines, and professional journals. His artwork has been displayed in over 40 group and solo exhibitions created in a variety of media including pen and ink, colored pencil, watercolor and airbrush. Tim is a Past President and Past Chairman of the Board for the Association of Medical Illustrators. He was the principle illustrator for the Johns Hopkins Family Health Book published in 1999, a contributing illustrator for the Smithsonian's Ocean Planet, a traveling exhibit, and is a coauthor of Surgical Pathology Dissection: An Illustrated Guide, now in its second edition. Tim has most recently authored and illustrated a book on the history of hot rod flame painting, recreating over 300 diecast examples in small scale, in press, 2003.